Playing a DVD in a Classroom Computer
Official support of DVDs ended on July 1st of 2019. The main cause of this policy change was due to several computer manufacturers announcing that they will no longer include DVD drives in their computers. Best efforts will be made to obtain teaching station computers with DVD drives for as long as they are available. It is recommended that online versions of such videos be located whenever possible. If you experience problems playing a DVD, Campus tech support staff will make a best effort attempt, but there have been cases where a DVD is damaged or not compatible with the drives available on campus.
No Endicott provided laptop computer has been equipped with a DVD drive for several years. iMac teaching computers are also not equipped with DVD Drives. If the space that you are teaching in is equipped with a laptop or iMac, please submit a ticket with AV Services to arrange to sign out a USB DVD drive.
Most classrooms are equipped with an "All-In-One" computer. On these machines, look to the side of the monitor and you will find a rectangular outline with a slightly raised button. Pressing this button will trigger the opening of the DVD drive. When inserting the disk, the disk's label should be facing you. Be sure that the side of the disk closest to the computer is inside of the DVD drive housing and the disk is snugly held by the free-spinning axle of the drive. When gently pushing the DVD into the computer, there should be very little to no resistance to movement until a gentle click of the drive door closing. If there is physical resistance to inserting the disk, DO NOT PUSH. Remove the DVD and attempt to close the drive, the same amount of resistance should exist with an empty drive as a drive with a DVD in it.
If the computer is a tower type computer (only 6 classrooms on campus), the DVD drive can be located in the equipment rack on the Lenovo ThinkCentre. On these machines, you will find a rectangular indentation on the front of the computer. In that indentation, you will find a raised rectangular button. Pressing this button will trigger the opening of the DVD drive. When placing the DVD in the drive, the label should be facing upwards. There should only be resistance to the drive closing when the door gently clicks shut.
Once the DVD is in the computer:
Step 1 - Look in the taskbar at the bottom of the computer and click the VLC logo (an orange and white highway cone) once. If the logo is not in the taskbar or located on the computer screen, click on the Windows Key in the bottom left corner and type VLC. The program is installed on all teaching computer by default and it will show in the search results.
 VLC Media Player Logo
Step 2 - With VLC Open, click
Media located in the menu bar at the top of the window.
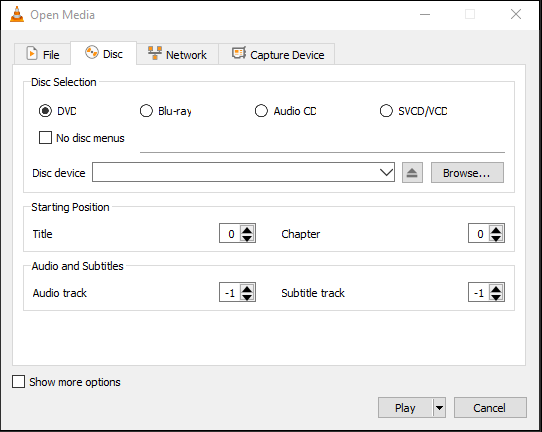
Step 3 - On the Media menu, select Open Disk.

Step 4 - A window will then open allowing you different menu options to be changed. Only click Play or tap the Enter key of the Keyboard. So long as there is only 1 DVD detected by the computer, this menu is not needed.
Step 5 - At this point, the DVD menu will appear and you can use the computer's mouse to select different DVD options including chapters or playback languages.
Helpful Hotkeys:
F = Enter Full Screen viewing
Esc = Exit Full Screen Viewing
(SpaceBar) = Play and Pause